Blog 12.My reflection on WordArt

reflection 1

Word Art is one of my favorite app. I think is really useful to have in a classroom. It is a very good way to organize all paper work, and add a bit of fun and color. It also helps with imagination, children can twist and stretch and have fun with the words. Younger children can learn letters, numbers and shapes in an enjoyable way. The app can be used for different occasions like Halloween, Valentines Day, Christmas, to create different pieces of art. It is interesting that you can introduce the child’s name so it becomes personalized.

There are some more WordArt effects that I would like to introduce to you,for e.g. how to get a rainbow text. Down below is a link you can access to get some help to create a rainbow text.

How to get Rainbow Text & Legacy WordArt Effects in Word 2013/2016

You can make cards for different occasions or use it on canvas to create special effects.

I will  introduce a link with how to use WordArt on canvas.

Also,this is how you can use WordArt in picture.

Follow these steps:
  1. While using Word, click (don’t double-click) on the WordArt graphic.
  2. Press Ctrl+C. …
  3. Start PowerPoint.
  4. With the Home tab of the ribbon displayed, click the down-arrow under the Paste Tool and then choose Paste Special. …
  5. Choose one of the available Picture types for pasting the image. …
  6. Click OK.

https://www.google.ie/search?q=How+do+I+make+a+word+art+picture%3F&sa=X&ved=0ahUKEwj1movFj8_XAhVkDMAKHftPCMoQzmcIRA&biw=1366&bih=61

Other things that children can do using ArtWord: they can draw or paint something like hand prints. Then their picture can be introduced in WordArt and then add some words.

kido

love


I found really interesting for the older kids that they can actually create WorArt online.Here are a few steps to follow. Hope you will enjoy it.

Cool Text is a great site that students can use to make fun graphic words and phrases. They can format the text with a creative variety of choices such as font, color (including gradients and outline colors), size, shadow, alignment, and output file format. Or they can keep it as simple as typing in the text and clicking “Create”.
free wordart maker

Here’s how in 5 easy steps:

  1. Type cooltext.com in your web browser.
  2. Click on a style you like.
    Note: If you pick an animated font, it will not be animated in Office 365 Online.
  3. Follow the directions to pick options such as size, color, and shadow. The choices will vary depending on the style you pick. Look at the sample at the top to see your results.
  4. When finished, click Create Logo. Right click on the WordArt and click Copy.
  5. Now you can open your Word 365 Online document or your PowerPoint 365 Online presentation in a new tab, right click, and choose Paste.
References:
Technokids, Create WordArt online, July 19, 2016.
Cristopher Alen Design, April 28,2014.

Blog 11. How to use WordArt in the Childcare Settings.

abc

WordArt in childcare is a must have tool. I find it really easy to access and not hard to use. It is fun and creative for the teachers and a good resource for learning for the children.You can introduce letters, shapes, colors and all sorts of characters in a classroom. With WordArt you can bring color and fun in a class.

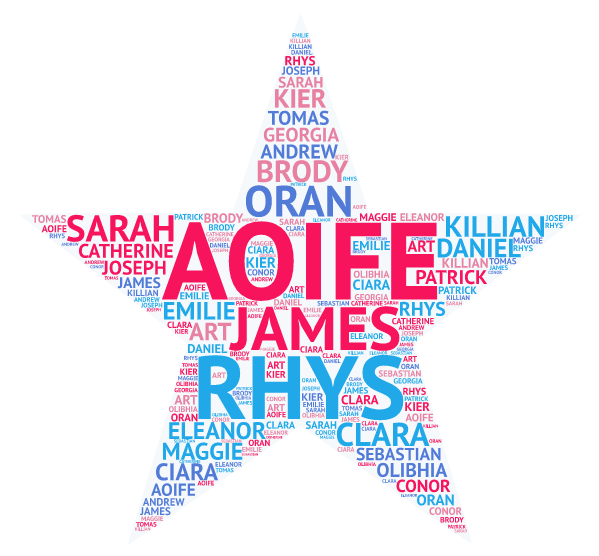
For my children in the class, I used WordArt to make a Star. This is going to be used for their Christmas Play, this year, called ‘ Shine Star, Shine! ‘ . I included all their names  inside the star using different colors.  They were very excited to see it; ‘ a star’ they said, and started to ask me what color is their name. Some of them looked for the letter their name begins with, some can recognize their name. It was an exciting experience for both,children and teacher.

New technology brings all kind of ideas in the class and help children achieve new visual information that will help them develop creativity. They learn through their senses, WordArt emphasize the color and shape children will use for their own drawing.

Down below is my piece of work in WordArt.

STAR

Also, with older children can be done so much. Here is an example I have got on pinterest.


pinterest

letters

I will also use WordArt to create some pieces of class work like, find the opposite, or match the correct numbers or letters. I discovered that the more you use WordArt the more ideas you get. Now I can share WordArt with the other teachers.

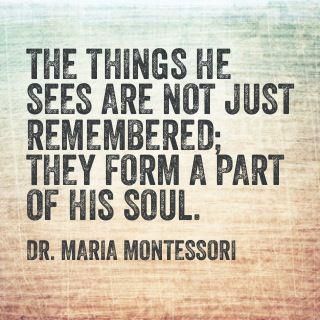
I would like to link WordArt to Montessori, that encourages the visual aspect in child development. It is very important the order in the class and in the materials children use,as the children visualize the aspect of the room and their piece of work, and that helps them be organised and keep things tidy. That’s what WordArt works at,it works at the aspect.


monteso

Blog 10. Introduction to WordArt

wordart

WordArt is a text modifying feature in Microsoft Word, a popular word processing program. It includes effects such as shadows, outlines, colors, gradients, and 3D effects that can be added to a word or phrase.WordArt is a text modifying feature in Microsoft Word, a popular word processingprogram. It includes effects such as shadows, outlines, colors, gradients, and 3D effects that can be added to a word or phrase. WordArt can also bend, stretch, skew, or otherwise modify the shape of the text.WordArt can be added within a Word document by selecting Insert→Picture→WordArt... This opens the WordArt dialog box, which gives the user several text styles to choose from. Once a style has been selected, the user types the text that the style will be applied to and the result is saved as an image within the document. The WordArt can then be moved or modified by selecting Modify→WordArt.

https://techterms.com/definition/wordart

After I introduced you to WordArt, I will put up a video that will show you step by step how to use this app.

To me it looks amazing, it seems very easy to learn how to use it. I think it is a great tool in a classroom, as children are very visual,they like to see,colors or shapes.

I will also show how to change WordArt.

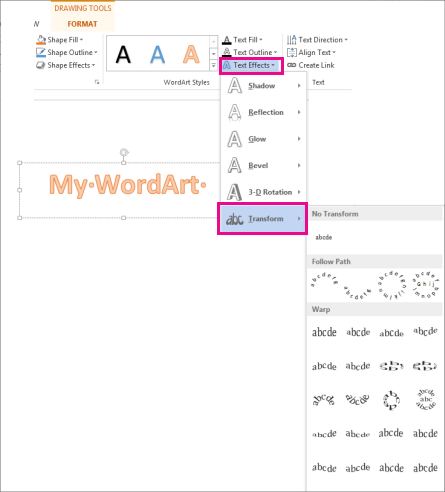
After you insert WordArt, you can change the shape of it by using the formatting choices on the Drawing Tools tab.

  1. Click the WordArt you want to change.Selected WordArt

    When you do that, the Drawing Tools Format tab will appear.

  2. On the Drawing Tools Format tab, click Text Effects >Transform and select the effect you want.Text Effects on the Drawing Tools Format tab, with the Transform gallery open

https://support.office.com/en-us/article/Change-the-shape-of-WordArt-58df52bd-3925-492b-8ab3-78ba53b46d0f

I will show you how to insert WordArt.

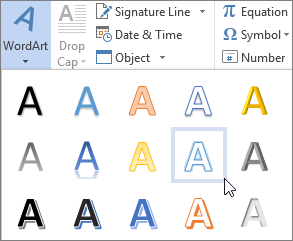
WordArt is a quick way to make text stand out with special effects. You pick a WordArt style from the WordArt gallery, launched from the Insert tab, which you can then customize.

WordArt example with the words Happy Birthday and a picture

2016, 201320102007

Insert WordArt
  1. Click Insert > WordArt, and pick the WordArt style you want.Choosing a WordArt option

    In the WordArt gallery, the letter A represents the different designs that are applied to all text you type.

    NOTE: The WordArt icon is located in the Text group, and it may appear different depending on the program you’re using and the size of your screen. Look for one of these icons:

    Large WordArt icon Medium WordArt icon Small WordArt icon

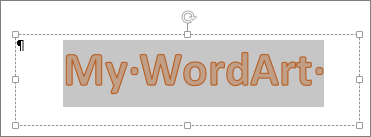
  2. The placeholder text “Your text here” appears, with the text highlighted.WordArt placeholder textEnter your own text to replace the placeholder text.
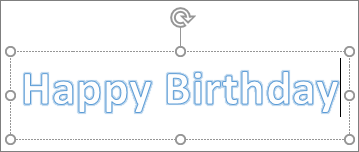
    WordArt with custom text

https://support.office.com/en-ie/article/Insert-WordArt-c5070583-1ebe-4dc4-a41f-5e3729adce54

References :

The Tech Terms Computer Dictionary, WordArt Deffinition, 3 December 2007.

Microsoft Office Support, Insert WordArt.

Blog 9. My Reflection on Adobe Spark

reflection

I like working with Adobe Spark. I’s amazing how many things you can create. I never thought that I could actually enjoy working on computers. It has been hard at the beginning but I am happy that I have developed some great skills now. Mostly I like the idea of being able to implement it in my class. The children can not wait until they’ll tell a story through Adobe Spark. I have already recorded them singing and that gave me the idea of recording them with the songs for the Christmas Play.That will help them improve their singing skills.

I have already spoke to one of the parents,asking her for accept on using her child’s voice on telling a story on Adobe Spark,  and she was excited that her daughter will be encouraged to be reading.

One of my colleges was surprised to see how much I could do with some computers knowledge.

Adobe Spark is a new technology approach on teaching in a classroom or helping with multiple ideas in a childcare.

Down below is a video on haw multi functional an app can be.


Technology in the Classroom: An Overview of Adobe Spark

Adobe Spark is a free graphic design app that allows students and teachers with no design experience to create impact graphics, web stories, and animated videos. With a goal of encouraging creativity and meaningful communication without requiring a degree in graphic design, Adobe Spark allows users to integrate text, photos, original fonts, video, audio, professional themes, and icons into simple-but-professional projects that communicate ideas cohesively and quickly. Project templates include social memes, mini websites, narrated tutorials, presentations, reports, posters, how-to videos, and more.

Technology in the classroom projects can require as little or much typing as you want, making this app perfect for younger as well as high schoolers. Because it plays well with the many other Adobe products (once you log into your universal Adobe account), you can access your personal collections in applications such as Creative Cloud, Photoshop, and Light room. If you’re struggling to move away from Microsoft Publisher because of cost or accessibility, this may be exactly what you’re looking for.

http://www.teachhub.com/technology-classroom-overview-adobe-spark

References:

Technology in the Classroom:An Overview of Adobe Spark, Jacqui Murray.


Blog 8. How to use Adobe Spark in Childcare Settings

adobe picture

It didn’t take me long to get used to Adobe Spark.I only had to ask my girls  to draw a couple of pictures,I inserted them one at a time, then I recorded the girls reading the story. How amazing was that! They were thrilled to listen to their own voices.

The next day I presented the story to my class. I explained first that the story was going to be read by children like them and that the pictures were drawn by the children, too.

They were amazed and listened to the whole story without moving. At the end I asked if they would like to tell a story or to sing a song. Almost the whole class put their hand up.

Down below I attached my little video, I hope you will find it very creative.


There are many other interesting and attractive activities that  we can do through using Adobe Spark, in a childcare setting.Here are some of them.

Speech and Language Play: Create a Spark Video story with a single picture per page, use big bold clear pictures (ideally isolated on a white or clear background to avoid distractions). Have the child go through page by page recording themselves naming the pictured object. (Note: Many teachers have asked how to create copies of blank or starter stories. You can do this by going to the Projects tab, tapping the project … symbol, and then selecting Duplicate).

Sight words proficiency: Create a Spark Video story with one sight word per page and with no recorded voice. Have the child go through page by page recording themselves reading the words. This can be repeated at intervals so that the children see the progress and improvement for themselves.

Rhyming Game: Show a series of pictures, and have the children use Spark Video to record a word that rhymes with it (as opposed to naming the picture).

 Playing with Shapes and Colors: I’ve seen lots of variants of this one, all of which thoroughly engaged the students. Assign a color and/or a shape, and have the students walk around the classroom or yard or school building taking pictures of matches. They can then describing them in a Spark Video story.

Second Language Acquisition: A variant of the above (this one shared with me by teachers teaching Chinese Mandarin and Spanish to English-speaking kids, as well as by an ESL teacher working with immigrant children) is to show pictures or words that need to be translated, having children record the translations. The same picture can be used on multiple pages so that the child records the same word multiple times, building proficiency while being able to hear the improved fluency.

https://spark.adobe.com/blog/2016/08/17/16-ways-to-use-adobe-spark-in-the-classroom/

References:

16 Ways to Motivate Students in the Classroom Using Adobe Spark.Amy Coperman, 17 August, 2016.

Amy Copperman, 17 August 2016.


Blog 7. Introduction to Adobe Spark

adobe


Adobe Spark is an integrated suite of storytelling applications for the iPad, iPhone, and web developed by Adobe Systems. It comprises three separate design apps: Spark Page, Spark Post, and Spark Video.(5)
In May 2014, Adobe launched Adobe Voice, a new animated video app for iPad that gives anyone the ability to create and share engaging video stories. Adobe Voice would later become what is now known as Adobe Spark Video.
n May 2016, Adobe launched Adobe Spark, a web tool that integrates Adobe Post, Adobe Slate, and Adobe Voice together into one unified design platform. With the change, each of the three previous iOS apps were renamed; Adobe Post became Adobe Spark Post, Adobe Slate became Adobe Spark Page, and Adobe Voice became Adobe Spark. (11)
What is Adobe Spark?

Adobe Spark enables you to tell stories and share ideas quickly and beautifully. Spark lets you create three types of content:

  • Use Page to create a story using text, images, and video. When you’re done we’ll present your story as a responsive web page that can be viewed in any web browser.
  • Use Post to create images optimized for social media; you provide images and text and we’ll help with the design. We’ll even help you create the right shape and size image for each social media platform.
  • Use Video to create, well, a video. Add videos from your computer or iOS camera roll, overlay text, add your voice and background music, and we’ll help turn your story into an amazing video to share with the world.

https://adobespark.zendesk.com/hc/en-us/articles/218922747-What-is-Adobe-Spark-


You can create individual Pages, Posts, and Videos, or you can use the formats together (including a Post image in a Video, or a Video in a Page, you get the idea).


How to create powerful presentation with Adobe Spark Video

With the brand new version of Spark Video, Adobe continues to lure consumers into photographer and designer territory via its creative mobile and web apps.


Adobe has updated Spark Video for the web, iPhone, and iPad by adding a video component. Previously, the app let you use a mixture of voice recordings, photos and icons, and a soundtrack to quickly create an inspiring, template-based animated presentation with a combination of your own assets and some help from online royalty free sources.

If you’re intent on creating marketing videos, school projects, product demos, event invites, business or team reports, or just plain storytelling, here’s how to do it with the video-enhanced latest version.

Before you begin, sign in with your free Adobe ID or log in using a Facebook or Google account. This lets Adobe publish and host your presentations, so you can easily access and share them. I used an iPad in this demo, but operations are similar on the iPhone and with the online app.

https://www.macworld.com/article/3151449/software-graphics/how-to-create-powerful-presentations-with-adobe-spark-video.html

References and Bibliography

Adobe Spark ,Wikipedia 19 May,2016

How to create powerful presentation with Adobe Spark Video, Jackie Dove 19 Dec. 2016

What is Adobe Spark, Knowledge Base,Google.

Blog 6. My Reflection on Google Slides

I think Google Slides helps with many things in a classroom.It helps the teacher create a range of educational materials,add details, emphasis color and shape, and make a presentation really attractive for children. Also Google Slides help teachers gain the confidence of using computer skills in an easy way.

You can encourage children in a classroom to draw and use their imagination ,when you create a slide show,an eBook with one of their piece of work. I only took photos of one of the children’s drawing and the other children around took pages and crayons and started to draw. It’s amazing the changes technology can bring in a classroom.

”Did you know that Google Slides can be used for much more than just presentations? Google Slides is one of the most flexible learning tools in the Google Apps suite. In fact, I used Google Slides to create my eBook: The Teacher’s Guide to Google Classroom! That’s right! Google Slides made the process of creating an eBook so much easier than if I had done it in Google Docs. Google Slides allows you to manipulate and edit images in ways that you cannot in Google Docs. That’s why a lot of the materials you see on Teachers Pay Teachers are created with PowerPoint or Google Slides. With Slides, you can add backgrounds, borders, and layer text boxes, graphics, and shapes. If you have ever been frustrated with trying to get an image in the exact spot you want in Google Docs, you may want to try it in Google Slides. Since you can easily convert your slides to PDF, the most universally accepted file format, your eBook can be read on practically any device.”

http://www.shakeuplearning.com/blog/how-to-create-an-ebook-with-google-slides/

Image result for GOOGLE SLIDES in childcare images

Today’s students face a technology-infused, innovation-filled world in their future.

We’re already looking at the possibility of widespread smart houses, autonomous cars and artificial intelligence that can talk to us and work on our behalf. Our parents’ and grandparents’ curriculum won’t be sufficient.

How do teachers identify the trends, predict what students will need and prepare them for it — all while the target is continually moving?

Thankfully, we teachers have some guidance. Many future-ready teachers, librarians, tech specialists and others share their successes and ideas freely on social media every day.

Also, the Education Department’s Office of Educational Technology has published a plan on “Future Ready Learning,” which highlights practices that can help students, teachers and schools thrive.

Here are five things you can do today:

1. Establish a Culture of Creativity

2. Pursue Success Through Collaboration

3. Seize Opportunities Everywhere — Online and in Real Life

4. Focus on Creating Instead of Consuming


5. Lead by Example Using Your Voice

http://www.edtechupdate.com/edition/weekly-dropout-stem-2017-09-23/?open-article-id=7284270&article-title=5-ways-to-teach-students-to-be-future-ready&blog-domain=ditchthattextbook.com&

References and Bibliography

5 Ways to Teach Students to be Future-ready ,Mat Miller ,August 2017

How to Create an eBook with Google Slides, Shake up Learning, Kasey Bell,

March 21,2016.

Blog 5. How to use Google Slides in a Childcare Setting


Image result for images of google slides in a childcare setting

http://plpnetwork.com/2015/10/28/5-ways-to-use-google-slides-in-the-classroom/

10 Google Slides activities to add awesome to classroom.

http://ditchthattextbook.com/2015/02/02/10-google-slides-activities-to-add-awesome-to-classes/

  2 Creative ways to use Google Slides in Education

One of the staple tools in Google Drive is Google Slides. Typically viewed as a tool to create linear presentations, much like PowerPoint, there are potentially two interesting approaches to using Google Slides in the classroom that move beyond traditional linear presentation slides. One is a hidden gem inside of Google Slides that allows a user to create linked presentations slides, the other turns Google Slides into a published book online.

Creating Choose Your Own Adventure Stories

The first slide acts as the starting point for the entire presentation. Insert an appropriate visual or text on the slide that will eventually act as multiple clickable links to subsequent slides. Then create additional slides that will house more detailed information, concepts, or visuals that will be accessed by clicking through the home slide.

To Create

  1. Adjust the settings of the shape to make it transparent
  2. Select the shape / image & click on the link option in the menu bar
  3. Change the linking option from hyperlink to “Slides in this Presentation”
  4. Select the appropriate slide to create the internal link
  5. Linking back – create a small shape or insert an image on each slide that either links back to the home slide or links to the next concept

Editing master slides and layouts

You may have noticed that when you select a different theme in Google Slides, it rearranges the text on your slides and adds shapes to the background. This is because each theme has built-in slide layouts and background graphics. You can edit these layouts with a feature called the master template editor. Once you learn how to use the editor, you’ll be able to customize your entire slide show with just a few clicks.

I created a sample of presentation down below.

https://docs.google.com/presentation/d/1Z_eOXQ7jYAfhXHIkRaolbwjKGUrOuM3-o8FIQhg9qWs/edit#slide=id.g29265447f3_1_8

References and Bibliography

5 Reasons to Replace Power Point with Google Slides,Joshua Kim January 18, 2015

Google Slides Student Tutorial, EdTech SMUSD

Using Google Slides for Elementary Children, Amy Chittenden

How to Use Google Slides (Quick Start Guide), Business- En Vato Tuts


Powerful Learning Practice

5 Ways to use Google Slides in the Classroom, Sheryl Nussbaum- Beach Oct 28, 2015


Blog 4. Introduction to Google Slides

google slides

Google Slides is Google’s flagship presentation app that lives inside the browser as a part of Google’s Docs.

It’s completely free, the only requirement is to have a Google account. Due to being a free web app, Google Slides isn’t as full featured as desktop apps like Microsoft Power Point.

Google Slides is an online presentation app that lets you create and format presentations and work with other people.

If you want to make a presentation, you need to click File, and then select ”Published to the Web.” Choose the amount of time before the slides advance. You can also select the option to have the slideshow begin automatically and to restart the slideshow after the last slide. Click ”Published content and settings”.

https://sites.google.com/a/ccpsnet.net/edtechhub/application-support/google-drive/how-can-i-make-a-google-slides-presentation-loop-or-advance-on-its-own

5 Reasons to Replace PowerPoint with Google Slides

 1.Built For Collaboration: Collaboration is the big reason to go with Google Slides. The ability to easily share and simultaneously edit a Google Drive document is the platform’s biggest selling point.Our presentations, like our documents, are increasingly created and presented with collaborators.
2.  Simple UI Encourages Simpler Presentations:It is possible to do animations and more advanced things in Slides, but the simplicity of the UI pushes you to create a simpler presentation. In an age where the one thing in higher ed that we all seem to agree on is that most presentations are bad, and PowerPoint makes presentations worse, a simpler tool for creating simpler and more visual decks may be our best way forward.
 3.Offline Access for Editing and Presenting: With the Slides app installed, and the settings set correctly in Google Drive, it is now possible to view, edit, and run Google Slides presentations when offline.
4.Access Presentation from Any Device: The ability to access any Google Drive document from any browser has always been a big selling point of browser based applications. There are lots of advantages, from always having your files backed up in the cloud to being able to keep working if your main computer dies.
5.Easy Web Publishing and Sharing: Slides makes it dead simple to share a presentation on the Web.  Go ahead and look at the Google Slides presentation 5 Reasons to Replace PowerPoint with Google Slides.
Here is an you-tube video on how to work with Google Slides.I will try to get one for students,to be easily followed.
References and Bibliography:
How to Use Google Slides(Quick Start Guide)- Business
5 Reasons to Reference Power Point with Google Slides, Joshua Kim,January 18,2015
Google Slides Student Tutorial, EdTech SMUSD.
Using Google Slides for Elementary Children, Amy Chittenden.

Blog 3. My Reflection on the use of Google Sheets in a Childcare Setting

child-girl-self-reflection

”If a child is in full-time day-care  the primary carer role is then shared between parents and non parents.Staff must make time to talk to parents.Order is of great importance in the child’s life.This is not possible without close communication between the different parts of the child’s life.This communication takes time.This works well in most centers but the children must be respected and not ignored while this conversations takes place.The time spent communicating with parents needs to be allowed for when allocating staff.”

Clare Healy Walls At the Heart of Montessori,The Infant Toddler(0-3 years)

Here comes the role of modern technology  to help with communication.Using Google Sheets,would allow us to shorten unnecessary time spent by parents and teacher at the end of the day when both parents and children are tired,the communication can be often interrupted and the information only partially passed.

Using Google Sheets app.This app offers Daily Reports and Photos for childcare centers and daycare providers. They sent notifications on your parent app for daily reports,photos,and invoices you send them.


https://play.google.com/store/apps/details?id=com.kinderlime.parent&hl=en&rdid=com.kinderlime.parent

https://play.google.com/store/apps/details?id=com.kinderlime.dailysheets&hl=en

Also for the parent- teacher meeting,the teacher  could store data in Google Sheets and  go through  the child’s developmental progress with the parent.It will help the teacher to cover all areas of development and  the parent will have the opportunity to find easily questions that may arise.